Content Blocks
Websites display content as a series of rows / horizontal containers. In Jolojo these are called Content Blocks.
Content blocks are used to define an area in which Plugins can be dragged into. Plugins contain the content, Content Blocks contain the plugins.

Adding Content Blocks
Enter Edit Mode by clicking on the pencil icon at the top of the left-hand toolbar menu.
On every page, you will find a Content Block '+ icon' by hovering your mouse over the content region or existing Content blocks.
If you are starting from a blank page, this icon is on its own. If you already have content on a page, there will be two '+ icons'; the top icon will add a new Content Block above the existing Content Block, the one at the bottom adds one underneath.
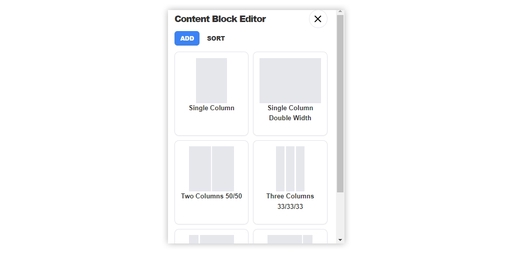
When the '+ icon' is selected, you will be asked to choose the Content Block you want to add to the page.
You can choose from:
Pre-populated Content Block
These Content Blocks already have Plugins (that you can then edit) in them.Blank Content Block
A range of useful column layouts within the Content Block row.User Saved Content Block
If you have saved your own Content Blocks, you will find them for re-use here.
It is good practice to Save the page after adding a Content Block - but it is not mandatory to do so before adding Plugins.
Sorting existing Content Blocks on a page
Hover your mouse over the Content Block for the on-page Content Block menu. Use the Up and Down arrows to move the Content Block up or down.
Delete a Content Block
Hover your mouse over the Content Block for the on-page Content Block menu. Select the Bin icon on the far right of the content block.
This will remove the content block and all plugins within the Content Block from the page.